The name Södera doesn't actually mean anything as such. “Söde” could be translated to “cute”, and the “era” part is a credit to Cookia A.'s Hedera Socks, because they inspired me to use that particular lace pattern.

The Söderas are fancy show-off socks, romantic lace socks, rock and hard core socks or even gothic depending on in which colour they are knitted in and what clothes and shoes they are worn with. Changing the ribbon in the top of the leg into contrast colour or to ribbon made out of special material also alters their image. The Södera Socks are knitted toe-up in order to make it easier to determine when to start the increases for the calf shaping. It also helps to define when the socks are high enough. Here you can find a few more pictures of these black Södera Socks, and here are some pictures of the dark brown version of the Södera Socks.
Women’s L (40–41). The size can be easily adjusted by knitting more or less of motifs in the instep section. Knitting one motif (= the 4 rounds of pattern) less shortens the sock with 1 cm (2/5 inch) and vice versa.
Materials
Yarn: Novita Kotiväki (100 % cotton; 166 meters/182 yards = 50 g, gauge 7,5 sts knitted plain = 1 inch), approx. 130 g. This is a Finnish yarn, and its availability is quite poor outside Finland. You can replace it with any yarn that has approximately same gauge.
Other materials: 0,5 cm (1/5 inch) wide elastic band approx. 1 meter (3 1/3 feet), 1 cm (2/5 inch) wide satin ribbon 1,5 meters (5 feet), crochet hook (and some sewing yarn and a needle to fasten the elastic band).
Needles
1 set of 5 2.5 mm (US # 1) double-pointed needles.
Gauge
30 sts/40–45 rows = 10 cm (4 inches) knitted plain.
One motif (= 4 rounds) of pattern stitch on 2,5 mm needles = approx. 1 cm (2/5 inch).
Pattern
Round 1: *K1 tbl, p2, yo, ssk, k1, k2tog, yo, p2*, repeat *–*.
Rounds 2 & 4: *K1 tbl, p2, k5, p2*, repeat *–*.
Round 3: *K1 tbl, p2, k1, yo, sl1, k2tog, psso, yo, k1, p2*, repeat *–*.
Rounds 1–4 = 1 motif.
Instructions
Cast on 12 sts on a double-pointed needle. Knit the first row. Turn the needle upside down so that the needle is on the down side and the cast on edge points upwards. Keep the right side towards you. With the help of the yarn and the crochet hook pick up 11 sts from the cast on edge and place them onto another double-pointed needle. The needle with the odd number of sts is now the 1st needle and the needle with even number of sts is the 2nd needle.
Distribute the sts evenly on four needles as folls: knit half of the 2nd needle’s sts onto one needle and the other half onto another needle. Then from the 1st needle k1 onto the 4th needle, then increase one st by working into front and back of the next st. K until the 4th needle has the same number of sts as on the other needles. The starting point of the round is now between the 1st and the 4th needle. Place a marker, because when knitting the sock toe-up the cast on yarn stays inside the sock and you cannot determine the starting point by the cast on yarn.
After distributing the sts on 4 needles starts the knitting of the toe part. The toe increases are made as folls: K until there are 2 sts left on the 1st needle. Work into the front and back of the 2nd last st, k1. K the first st on the 2nd needle, then work into the front and back of the 2nd st. Continue knitting and increasing like this so that on the 3rd needle you increase one st as on the 1st needle and on the 4th needle you increase one st as on the 2nd needle. In order to shape the toe part neatly increase like this in the beginning on every round. When there are 12 sts on every needle increase only on every second round. When there are 15 sts on every needle stop the increases and knit three more plain rounds with these 60 sts.
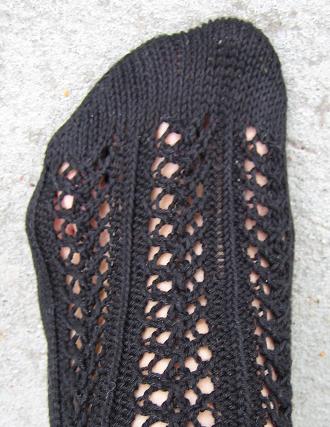
Instep
Before starting to knit the pattern, distribute the sts onto the needles as folls: 15 sts on the 1st needle, 15 sts on the 2nd needle, 16 sts on the 3rd needle and 14 sts on the 4th needle. From now on the sts on the 1st and 4th needle (= 29 sts) are knitted plain and the sts on the 2nd and 3rd needles (=31 sts = 3 motifs + 1 st) are knitted in pattern.
On the first round of the pattern the sts are distributed on the needles as folls:
1st needle: Knit.2nd needle: K1 tbl, p2, yo, ssk, k1, k2tog, yo, p2, k1 tbl, p2, yo, ssk.3rd needle: K1, k2tog, yo, p2, k1 tbl, p2, yo, ssk, k1, k2tog, yo, p2, k1tbl.4th needle: Knit.The bottom of the instep (1st and 4th needle) is knitted plain, and the top side (2nd and 3rd needle) is knitted in pattern.
Continue working like this until the instep is long enough (in size L 13 motifs). The easiest way to determine when the instep is long enough is to compare it to some other sock: when the instep reaches the same point as were the gusset in the other sock begins, it is time to start the heel.
You can knit the heel as you like to. The following instructions are for a plain German heel. For the sake of clarity the heel should be started after a full motif, that is, the last round knitted before starting the heel should be the 4th round of the pattern.
Heel flap
K the sts on the 1st needle onto the 4th needle = 29 sts. Leave the sts on the 2nd and 3rd needle waiting and knit back and forth with the 29 sts on the 4th needle. Turn, sl1 purlwise, purl to end. Turn, sl1 knitwise, knit to end. Continue like this in total 30 rounds, the last round being the right side.
Heel decreases
Distribute the sts of the heel flap into 3 sets on the needle. Use markers to separate the sets: 9 sts, place marker, 11 sts, place marker, 9 sts. The decreases begin on the wrong side: sl1 purlwise, p18, p2tog, turn, sl1 knitwise. k9, ssk, turn. Sl1 purlwise, k9, p2tog, etc. until all the sts of the side sets have been decreased. The last row with decreases is worked on the right side, and there are 11 sts on the needle.
Gusset
With the help of yarn and crochet hook, pick 16 sts from the edge of the heel flap, knit pattern on the 2 needles that have been left on to hold, and then pick 16 sts from the other edge of the heel flap. Distribute the 11 sts of the heel onto the same needles with the sts you just picked = 74 sts. The starting point of the round is now in the middle of the heel.
Start the gusset decreases: K on the 1st needle until there are 3 sts left. K2tog tbl, k1. Knit pattern with the sts on the next 2 needles. On the following needle k1, k2tog tbl, K to end. On the first round the picked sts should be knitted tbl in order to avoid emergence of holes.
Do the decreases on every other round until there are in total 60 sts left on the needles. Knit another 2 rounds without decreases so that you get to finish the pattern motif on the 2 needles. Knit the sts on the 1st needle, so that you are now in the beginning of the 1st pattern needle. From now on this will be the starting point of the rounds. Now distribute the sts on three needles and continue in pattern with all sts.

Leg and the calf shaping
Knit in pattern with all sts. Try the sock on once in a while so that you can determine when to start to increase the stitches for the calf shaping. The sts are best to be distributed on several needles to ease the fitting. The larger the calf circumference/the shorter the leg, the earlier the calf increases should be started. In the model socks the first increases are made after knitting 27 motifs starting from the heel. The increases are made as folls: increase in every second [p2, k1 tbl, p2] stripe one st by lifting the yarn between the two purl sts on the needle and purl it tbl = 66 sts. From now on the sts in the stripes between the needles are worked as [p3, k1tbl, p3].
Work like this for 8 rounds (=2 motifs) and then increase in the other three *p2, k1 tbl, p2* stripes as well = 72 sts. Now, for example, the first round of the pattern is worked as folls: *k1 tbl, p3, yo, ssk, k1, k2tog, yo, p3* etc. Additional increases can be made in the stripes between the purl sts as often and as much as is considered to be necessary. Remember to try the sock on frequently enough so that you can determine when the circumference is right.
When the leg is high enough (in the model socks 36 motifs from the heel), after the last round of pattern (= 4th round) work a round with holes for the ribbon as folls: *k/p2 (knit or purl depending on the st), yo, k/p2tog*, repeat *-*. On the next round start the k2, p2 rib. Work in rib pattern for 2,5 cm (1 inch) and cast off the stitches loosely. Break yarn and weave in ends.
Ribbons and finishing
The risk with knee high socks, and especially ones made out of cotton yarn, is that they may easily slip down to ankles. To avoid this you can use elastic band to hold them up. Thread the elastic band into the holes on the round knitted before the rib, set the ends one on the other and sew them together. Be careful not to make the elastic band too tight!
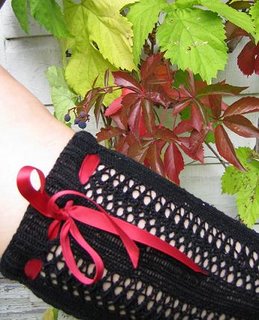
If you use a ribbon made out of satin or some other synthetic material, the end of the ribbon should be ”neatened” to avoid its unravelling. This can be done with the help of a candle: cut the ribbon ends glancing and move them slowly across the heat from the candle. Do not place the ribbon straight into the flame! One inch from the flame is hot enough to melt the ribbon’s ends not burning them into pitch black. Thread the ribbons onto the elastic band from the same holes, put the socks on and tie a bow.

Hello! I'm a old fan of your sights. Now I'm knitting Soderas with your instructions in englis, and I'm loving them! Maybe I'll be the quickiest one and can report if there is a flaw in the pattern... Maybe, maybe not :P
VastaaPoistaBut anyways, thanks a lot!! These are just the socks I'm allways dreamed off!
I'm so sorry that my english isn't flawless, but it's been so long since I used it after school :D
I've allways dreamed off.. Kato nyt, mun hyvä juttu meni ihan lörinäksi :D
VastaaPoistaHeh, kyl mie ymmärsin ja eiköhän muutkin! ;)
VastaaPoistaKerropa ihmeessä jos ja kun törmäät virheeseen tai epäjohdonmukaisuuteen, tiiän sitten korjailla sitä mukaa. Ite on niin sokee omille virheilleen ettei niitä huomaa vaikka ne tanssis ja laulais lambadaa mun nenän päällä. :P
What a great sock pattern! Thanks for making it available in English as I can't speak your language.
VastaaPoistaYou're welcome, Lynne! Have fun knitting the socks! :)
VastaaPoistaVilma, those socks are awesome! I've had the intention of designing some kind of lace sock that would wear well with heel and you're pattern is just that! These are definitely going to be on my REALLY SOON to be knit list!
VastaaPoistaThanks for sharing your gorgeous pattern Vilma. x
VastaaPoistaThey're stunning! I must have them! I've only knit one pair of socks to date, but these are next.
VastaaPoistaThank you so much for the English translation. I can't wait to get started on these! They're just gorgeous.
VastaaPoistaHi, I just love this pattern. Thanks so much for posting instructions. It looks just gorgeous on you. Someday, when I'm good enough, I'll attempt it too!
VastaaPoistaThank you for post this pattern. These socks are spectacular!!
VastaaPoistaThanks for posting your pattern. I bet that Cookie was flattered that you were able to tweak something of hers.
VastaaPoista=:8
Thanks for posting the pattern. I just finished knitting a pair and they are beautiful. I am a first time sock knitter and had no trouble with the pattern.
VastaaPoistaThese are gorgeous. I wanted to design something like this myself, but I'm glad you did it for us.
VastaaPoistaMoi! Olisiko sulla tähän suomenkielistä ohjetta valmiina? Olen vähän huono näiden englanninkielisten ohjeiden kanssa kun niihin pitää paneutua oikein tosissaan...
VastaaPoistaHeippa! Kyllähän näihin on olemassa myös suomenkielinen ohje. Se löytyy tuolta blogin yläpalkin Ohjeet - Patterns -sivulta. Sivun lopussa on lista ilmaisohjeista, joiden joukossa myös kaipaamasi Södera-sukkien ohje (pdf-muodossa).
PoistaThanks for posting the pattern. I just finished knitting a pair and they are beautiful. I am a first time sock knitter and had no trouble with the pattern.
VastaaPoistaCara belajar Bisnis Online
Aneka Macam Tips Ter Update
Kumpulan Manfaat Buah
Jam Tangan Online Murah
Blogin hallinnoija on poistanut tämän kommentin.
VastaaPoistaBlogin hallinnoija on poistanut tämän kommentin.
VastaaPoista